• Showing posts with label painting. Show all posts
    Showing posts with label painting. Show all posts

    Monday, December 29, 2014

    Easy Coffee Can Bird Feeders


    This is one of the coolest homemade birdfeeders I've ever seen!

    One of the best ways to observe nature close up is to put up a bird feeder, sit back and watch the birds in action.  They can be very entertaining!

    Here is a recycle crafty project that will take something you usually toss away and use it for an awesome purpose.  Colorful birdfeeders hanging from the trees in the garden add so much color and great for the dormant season when there is a scarcity of color outdoors.

    The birds will thank you!

    Click here for the tutorial.


    Sunday, September 7, 2014

    DIY Painted Concrete Porch


    For the longest time I've wanted to paint the concrete floors in the carport. The project keeps losing its place on the priority list, but after seeing this porch . . . that may change.

    This porch was all done with paint and stencils.  How easy is that?  For me, the hardest part would be getting the floors clean since it is outside.

    I'm totally impressed!

    Click here to go to the tutorial.


    Wednesday, August 13, 2014

    DIY Printed Jeans


    Fabric embellishment . . . one of my favorite things!

    You would not believe how simple it is to create your own printed jeans.  

    What awesome inspiration!  This method is not just for jeans . . . you can embellish t-shirts, fabric for purses, notebooks, canvas or tennis shoes . . . there are unlimited projects this technique can be used for.  

    Click here for the tutorial.


    Saturday, June 21, 2014

    Summer Mason Jars


    Here's more inspiration for decorating glass jars!

    I love the theme . . . great idea and so cute for a summer picnic.

    Click here for instructions on how Dee make them.

    Thanks for the inspiration!


    Wednesday, April 30, 2014

    Hubcap Flowers Yard Art . . . Awesome DIY Recycle Project


    Love this recycling yard art project!

    I'd love to mix the pops of color in my garden from the different flower yard art DIY projects I have been finding online lately.

    At first glance, you would never guess these are hubcaps.  I'm guessing they are easy to find relatively inexpensively.  You pull-em salvage car parts businesses come to mind.

    Click here for the awesome tutorial to make these beautiful Hubcap Flowers.

    Click here for another blog post featuring many examples of DIY Yard Art Flowers made from various materials with lots of ideas and inspiration.  Very interesting . . . love these type of blogs!


    Wednesday, April 16, 2014

    DIY Glass Garden Flowers


    Love this colorful recycling concept for the garden from Birds and Blooms.

    Having said that . . . I am cringing at the thought of using vintage glassware that I love so much!! 

    What I would do is visit dollar stores and use inexpensive glassware to convert to make these beauties.

    Click here for instructions on assembly and painting glassware.


    Tuesday, April 8, 2014

    Recycled plastic flowers


    What a colorful statement for your garden!

    I love those recycling projects that have such a pretty use.

    This project comes from Birds and Blooms, one of my favorite magazines. Check out their website for more projects, gardening and birding tips.


    MATERIALS:

    • 2 or 3 same-size plastic soda bottles
    • Waterproof permanent adhesive
    • Gloss spray paint for plastics
    • Small scrap of Styrofoam block
    • Scrap of colored foam for backing
    • 3/8-in.-wide x 24-in.-long wooden dowel rod
    • Opaque permanent paint markers
    • Paper-backed duct tape sheets (optional)
    • Scissors or craft knife for bottle trimming
    • Flexible ruler

    STEP-BY-STEP INSTRUCTIONS:

    STEP 1

    Wash the bottles and let dry. Use a flexible ruler and permanent marker to make an even circular line as a cutting guide about 1/3 of the way down from the tops. Cut and discard top portion of bottles, keeping the bottoms to make the flowers.

    STEP 2

    Place bottles upside down on scraps of cardboard or newspaper in a well-ventilated area. Stand the dowel rod in the Styrofoam block to make it easier to paint. Following manufacturer’s instructions, spray-paint exterior of bottles and dowel rod. Apply as many coats as needed for complete coverage. Let dry and remove the rod from the Styrofoam.

    STEP 3

    Using a permanent marker and flexible ruler, lightly mark sections evenly around perimeter of each bottle for flower petals. For small bottles, mark about every 1 in.; for larger bottles, mark about every 2-1/2 to 3 in. Use scissors or a craft knife to cut vertical slits on marks, making several flower petals. Stop cutting each slit at the ridged base of bottle bottom. If desired, trim ends of petals into rounded shapes.

    STEP 4

    Bend the petals forward so they’re at right angles to the center of the flower (the bottle bottom), creasing each one at the ridged base of the bottom. If needed, bend and press firmly several times until the petals stay in place.

    STEP 5

    Using permanent adhesive, attach the bottles by stacking bottoms with petals outward. Stagger the placement of petals. For inner bottles, bottoms may have to bend slightly to fit inside outer bottle. Let adhesive dry.

    STEP 6

    If desired, cut a 1-1/2- to 2-in. strip of duct tape to fit the perimeter of the top flower’s center. Decorate the center of the flower using the paint markers.

    STEP 7

    Attach the dowel rod. For larger stacked bottles, cut small crisscross slits through the side of the middle bottle. For smaller stacked bottles, cut a small V-shape slit from the back edge of the last bottle. Put one end of dowel rod through slit, running it across the width of the bottle bottom until it meets the opposite inner side. Use permanent adhesive to glue dowel rod in place at both sides. Let adhesive dry.

    STEP 8

    Cut a circular piece of colored foam slightly larger than the opening on back of flower and secure it with glue around the edges. Let it dry.
    Stick your soda bottle flower a few inches into the dirt, indoors or out. No need to water it!

    Tuesday, March 18, 2014

    DIY Mod Podge Closet Hangers


    You all know how much I love Mod Podge . . . one of the greatest crafty inventions ever!

    Here is another awesome idea that I would love to do for my closet . . . but I need to organize it first, so I will be procrastinating for sure.  

    Virginia from the blog Live Love DIY came up with an ingenious project for those ugly wooden closet hangers.  She even color coordinated them to match her painted furniture!

    Click here for the tutorial.


    Tuesday, March 11, 2014

    Grocery Store Bag Storage


    Love this recycled tin can painted to hold grocery bags!

    Grocery bags can get so out of control and I really hate throwing them away since they will definitely get used.  There are several methods I already use to keep them under control.

    They stuff nicely into toilet paper or paper towel rolls.  Easy to store too!

    Turn your fabric scraps into drawstring bags.  One large sized bag will hold lots of grocery bags!

    The painted can is of interest to me since I love those coordinated painted projects.

    Bonnie Donahue has lots of other tips for under-the-sink storage and organization.  Click here for the original post with instructions for making the painted can.


    Monday, March 10, 2014

    Rich Layers of Color . . . Awesome Painting Techniques


    I'm almost speechless . . . this is my kind of furniture finish!!

    It is amazing what you can do with some paint to put new life into an old piece of furniture.  All you need is imagination, some basic knowledge of painting techniques and the creativity to come up with your own techniques.  After all, it is only paint, right?

    This awesome project comes from Shizzle-Design.com . . . click on the link for their tutorial on this painting technique.

    Some facts about Shizzle Design taken from their website . . . I'm impressed and can't wait to explore their tutorials and projects!


    Did you know that…
    • We’ve opened up a Shizzle Design Paint Studio at 2018 Chicago Drive, Jenison, Michigan 49428?  This is where Cathy and I paint our furniture but we want our customers to know that we’re here for you.  We encourage everyone to stop in any time to buy paint or to get your questions answered.
    • We’ve taught people from all over the United States and Canada how to paint furniture Shizzle Style using chalk and clay paints?  Join us for one of our super fun workshops.  Learn hands-on in a relaxed environment. Click Paint Workshops to see a list of current classes offered.
    • You can Subscribe to Shizzle Design for tips, tutorials, ideas, pictures, videos for our furniture painted in all natural chalk and clay based mineral paints.
    • Did you know that you can get these sent directly to your inbox and that it’s FREE?  It is ~ what are you waiting for?  Enter your email in the right hand column of our blog to stay in the loop.
    • We have a Shizzle Design Facebook Page.  We share all sorts of additional tips, ideas, photos EVERY DAY and offer special deals (which you’ll only know about if you’ve Liked our Facebook Page).
    • We have numerous Pinterest Boards  Stop in and check out our extensive portfolio ~ Pin us on Pinterest
    • We sell our painted furniture at Not So Shabby Antiques and Fine Furniture at 2975 West Shore Drive in Holland, Michigan
    • We  sell American Paint Company Paints & Supplies our of our Shizzle Design Paint Studio (headquarters) 2018 Chicago Drive, Jenison, MI  49428 as sell as several other locations in the greater Grand Rapid’s area. Click LOCATIONS to find out where we’re located.  We also ship the paint domestically and internationally through our Online Shizzle Shop.

    Ready for another project?


    Beth at Make Me Pretty Again used a 
    milk paint technique to give new life
     to this gorgeous french vanity.  

    Love the color!!


    Tuesday, March 4, 2014

    DIY Sea Glass Jar


    Love the look of sea glass on these glass jars!

    The simplicity of the recycled glass jars
     and flowers is beautiful.

    If you haven't already, start saving
     those glass jars for some awesome
     craft projects.

    Click here for the tutorial.

    Here is another tutorial!


    Tuesday, March 5, 2013

    The Red Dresser!


    Look at what you can do with someone's cast off furniture!  I've been thinking about painting our wood bedroom furniture for a while and since I saw this dresser, I am convinced.  Love love love the red, although I was originally thinking of glossy black with gold-leafed hardware.

    It is amazing what a little paint and effort does for a tired piece of furniture.

    See the before and after pictures here.


    Monday, September 26, 2011

    Be Colorful!


    One of my favorite things is painting with bold colors!

    I love this colorful cabinet . . . and the lamp is awesome :)

    Think of what you could create with a thrift store find!

    If painting and DIY is your thing, you will love Be Colorful, one of my recent blog discoveries.  It is one of those blogs that I spent way too much time going through, but the inspiration was so worth it!  I'm ready to go thrift store shopping :)  

    You must check it out!

    Click here for more colorful ideas from Be Colorful :)


    Becolorful

    Join in the linky party every Monday . . .
    show off your new creation or be inspired!


    Wednesday, August 10, 2011

    Beautiful Decoupaged Jars


    Kristen at Lesson Plans has featured these decoupaged
     jars made out of custom created tissue paper.

    Another project for those like me who collect and
    recycle glass jars . . . and for fans of Mod Podge.

    Wouldn't this be an awesome project for the kids?

    Click here for the post on her blog.


    Thursday, August 4, 2011

    Painted Floor Cloth


    OMG . . . I adore this laundry room!

    The floor cloth is hand painted on canvas . . . how cool is that?

    This project comes from Peggy and Liz on their mother/daughter 
    collaboration blog called Just About Home.

    Click here for the tutorial.


    Tuesday, July 12, 2011

    Modern tie dye


    Tie-dyeing was all the rage
     in the late 1960s and early 1970s,
     identified as the hippie style.

    The look is accomplished by folding the material into a pattern, binding it with string or rubber bands and applying dye to only parts of the material. The ties prevent the entire material from being dyed.

    You can recreate the tie-dye look easily with fabric paint . . . really, it is all in the folding . . . you don't have to mess with all those chemicals if you don't want to!  Click here for the tutorial :)


    There are so many patterns and
     techniques when it comes to tie-dye!

    Want more information?

    Click here for a list of tie-dye links


    Wednesday, April 20, 2011

    Faux Patio Tile (painting technique)


    Learn how to transform your concrete floor into something fabulous!

    We have been working on our carport, turning it into an outdoor living space and was already planning to paint the concrete floor, but now I am super excited about starting this project after seeing this patio.

    Click here for the painting technique.

    Click here for the blog post featuring this patio.  I've gotten so much inspiration, including an idea for outdoor curtains . . . I want this patio!!


    Sunday, April 10, 2011

    Jewel tone glass painting technique


    Gorgeous painting technique for glass!

    Regular readers of my blog know that I have a thing about
    recycling glass jars.  My favorite project is making candles in
    glass jars.  This painting technique would be the perfect
    glass finish for those jars!

    Click here for the tutorial from Deco Art.


    If you love crafting with glass like I do, click here 
    for other crafty glass projects I've posted on my blog.


    Friday, April 8, 2011

    Clever crafty ideas


    Would you believe these are faux milk glass?

    They look like the real thing.  All you need is some paint!

    Faux milk glass tutorial


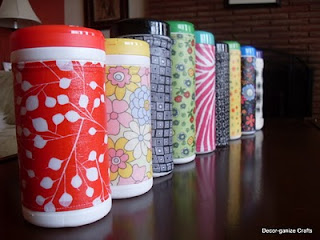
    At first glance . . . do you know what these are?

    These cuties are cleverly disguised cleaning wipes containers.
    Now you can color coordinate them to match your decor!

    This project comes from Heather at Decor-ganize.
    Click here for the tutorial.


    Have you ever used photos transferred
    to fabric in your projects?

    Back in the day, I used a medium specifically for this purpose, but the results
     were awful, even though it did transfer the photo image to fabric.

      Fast forward a decade or so . . . you can now use your printer to transfer
     photos to fabric.  Sound good?  It is easier than you probably think it is!

    Click here to go to an awesome tutorial from
    Linda Matthews at A Creative Journey.


    Thursday, November 18, 2010

    Painting Your Home DIY


    One of my greatest passions is painting . . . all kinds of painting, using a variety of mediums.  If I could comfortably get up on a ladder for extended periods of time and not so afraid of heights, I would make my living as a decorative painter . . .


    There is nothing like changing the colors on the walls to make an instant change to a room without a huge investment.


    Are you into DIY painting?  If so, you will want to check out Painting Your Home . . . includes tutorials, ideas and resources to paint your home beautifully.


    You know that I'll be blog hopping today . . . awesome variety of blog hops on Thursday . . . check them out!  They will all be permanently listed on the side bar or at the end of all of my blog pages . . . I love them!


    Have an awesome Thursday!


    Thursday Blog Hops
    Obviously MARvelousBassgiraffe's Thoughts Thursday Blog Hop
    PhotobucketThe Two Savvy SistersBaby Blogger Thursday

    Thursday Blog Hops
     moonangelnay thursday blogspot link party blog hop